Monday, April 26, 2010

Lab 11 - Student Presentations

The last week of official labs for this course centered around the student made presentations on invasive species. After a fifteen-minute quiz, the teaching assistant and I moved to the back of the classroom and allowed the groups to present their findings on the species they chose. Presentations provided the region that was invaded, damages done by the species, and control attempts for the species.

Presentations proved to be an interesting way of dividing up a subject into parts for groups to learn and discover on their own. Then when the groups present, the rest of the students have a chance to learn what other groups learned. Each group had an out of the ordinary point to make, which allowed for the invasive species being presented to provide an interesting subject for listening.

Essentially group presentations can be assigned to help promote public speaking, teamwork, and to push students to look up more information on their own rather than from just the workbook. It is another of the wide variety of tools the instructor has to educate students in nonstandard ways. Presenting information in full and answering questions at the end of their presentation ends up ensuring that if the student did not look up all he or she could have about their species, than the lack of information will definitely be noticed. The only thing that could be improved about this lab is changing the guidelines for the presentations to only include videos that contain specific pictures or actions the species performs. Many of the groups instead had videos explain their species, when the group itself could have easily summarized the video. To help with finding information on invasive species for future students, they could try going to these sites to find information on invasive species and their effects on environments.


http://www.invasivespeciesinfo.gov/index.shtml and http://www.invasive.org/

Monday, April 19, 2010

Lab 10 - Isle Royale

Isle Royale is a computer lab consisting of simulations for the study of population ecology. The program used simulates portions of the history of Isle Royale in Minnesota during the early 1900s, where moose arrived to find a habitat with immense food and no predators. In the 1940s, however, wolves arrived on the isle and began preying on the moose, resulting in a near model predator-prey interaction cycle.

The teaching assistant provided a lecture consist of terms and concepts for population ecology at the beginning of the class, and then using this information the students began working through the workbook, following the instructions for the simulation and answering related questions. During this time, I walked around the room, assisting students with the computers and asking them concept questions on the simulation, since it was a perfect opportunity to verbally reinforce their knowledge.

While the simulation is quite visual in displaying the numbers of moose and wolves as shown in the pictures at the bottom, students still had some difficulty grasping climate change concepts and their effect on the animals. With two students to a computer, however, teamwork and discussion helped many groups as they worked through the instructions. These are two very important elements that have taken place in nearly every lab, and it is an important factor in determining the amount of knowledge and experience the students can walk away with. This lab used an interesting simulation for the subject and had students use teamwork and problem solving discussions to complete it. The only improvement that could be made is one involving a greater look into the actual Isle Royale natural experiment and what the status is of it as of now.


This is the simulation the students used to analyze moose and wolf population ecology.


Monday, April 12, 2010

Lab 9 - Invasive Species and Biological Control

The invasive species and biological control lab easily becomes one of the most interesting labs of the semester. To start things off, the teaching assistant first gave his lecture over invasive species and biological controls. This included a discussion of the difference between invasive and introduced species, as well as displaying numerous picture examples of foreign and local invasive species. One of the prime examples shown that students grasped without difficulty was kudzu, due to its notorious spread across the south.

Students then proceeded to look at examples of invasive species and biological controls around the room. They also had to call upon their microscopy skills to make a wet mount of entomopathogenic nematodes and diatomaceous earth in order to view both under a microscope. The diatomaceous earth was easily seen, but the concept gave some students trouble when determining if it was a biological control. This proved to be the most asked question of the class but also the easiest answered. I would point out to the student that biological control meant a living organism was being used to control other organisms, and then I asked if the diatomaceous earth was living. From there the students were able to answer it for themselves. The topic was a good way to lead the students to find their own answer, and thus remember the path to how they got their answer later on.

The examples in the class included some living organisms, as the pictures below show. Almost in a “show and tell” fashion, the examples were spread out around the room with information sheets next to them that students had to read and examine. I say “show and tell” because bringing in specimens like a brown widow or aphids is always has a unique interest factor that peaks the students’ curiosity. By seeing the specimen up close, later on they can picture that specimen in their mind and hopefully be able to remember the role and impact it plays in the environment. As such, the lab is one of the most memorable for students for all the specimens they viewed. The only thing that could have improved this lab is perhaps adding a section in the lab manual specifically for the impact that invasive species have. Here students would read what an invasive species does to an environment and then predict what that species would do to certain crops or other environments. It would be a good way to conclude the lab and send off the students with a thought of how critically destructive invasive species can be.


Below are pictures of some of the examples that were laid out around the classroom.


The brown widow parasitoid, a biological control.


Pea aphids, an invasive species.


The eastern mosquito fish and the decapitating phorid fly, both biological controls.


The parrot feather, an invasive species.

Monday, April 5, 2010

Lab 8 - Aquatic Ecology: Biotic Components

Continuing the Aquatic Ecology lab is the biotic components lab, which is another outdoor lab at Lake Wells on campus. The lab involved a sampling of organisms at the lake and then identifying them back in the classroom. By seeing the different types of organisms that live and interact, the students are able to see how ecosystems work with a local example.

To gain this understanding, the teaching assistant first taught about what ecosystems are and the different trophic levels that exist within them. The class then proceeded to the lake with buckets and sample bottles and used small nets and waders to collect plankton, macroinvertebrates, and plants. By having them collect their own samples, the concepts of how these organisms exist in an ecosystem is seen first hand, such as how a student will collect dragonfly larvae, and then think of how it got there and what it does to survive.

Identification of the samples was then started back in the classroom. All benches had field guidebooks for students to look up organisms. It is also interesting to note that microscopy had a tie in into this lab. Students utilized simple and compound microscopes to look at macroinvertebrates and plankton. They also used Lugol’s solution and glass slides to make their own wet mounts of plankton. Most of the students were able to remember how to use the microscopes, and this opportunity helped refresh the knowledge in their heads.

This turned out to be a great follow up lab for the biotic components. Now that students know both components, they can understand the interaction between water quality and the organisms who inhabit the water, as well as what balance between the two is needed for a healthy ecosystem. The only thing that could have helped this lab more is providing other ecosystem organisms to compare and contrast with Lake Wells’s organisms.


Nets, glass slides, and Lugol's solution were used for collection and identification of plankton.


Microscopes and identification guides were set out for student use.


These were many of the previous collected organisms that were available for viewing by the students.


Monday, March 29, 2010

Lab 8 - Aquatic Ecology: Abiotic Components

Aquatic Ecology is a lab that is split into two weeks, the first covering abiotic factors, and the second covering biotic factors. The abiotic factors consist of heading outside to Lake Wells on the campus of Georgia Southern University. There the class took measurements of the quality of water to determine the lake’s health. Measurements covered water temperature, dissolved oxygen, pH, conductivity, nitrate and phosphate. The class was divided into groups and measured each factor. From there, the class went back to the classroom to finish up questions and come to a consensus on the water quality of Lake Wells.

This week consisted of my last week actually teaching the classes. I chose to teach abiotic factors because I wanted to gain both an indoor and outdoor teaching experience. The class started off with a quiz, but then I took over from there. I explained my lecture on abiotic components, covering reasons such as why we measure the quality of water, as well as what affects the quality. As my lecture concluded, I explained the instruments the class would be using. I then demonstrated the use of the meters, explained how the nitrate and phosphate test kits worked, and covered safety with said chemicals. I wanted to be sure that everyone knew the correct procedures before we went outside, where talking to the entire class would become a bit more complicated.

I led the class outside to our testing site, and then let them work amongst their groups to test the water. I made sure no one strayed, and went from group to group, giving advice and answering questions. Once everyone finished, we went back to the classroom, where I made a few final points about Lake Wells’s water quality before I let them leave.

Overall, teaching outside was an insightful experience. Keeping control of the class did not end up being too hard, as my classes have always been well behaved. I did enjoy making the final points at the end of class because I think that they really drove home the point of the lab and hopefully will stay in their minds. The only thing that could have helped this more would be the addition of another water sample test site to compare Lake Wells to. To me, I believe that I have improved significantly from my first time teaching three weeks ago. I feel more confident about my ability to address the class and deliver a well-spoken lecture, as well as to effectively lead students in lab work. Once I had gotten over my first time in front of people as a teacher, I have definitely felt more at ease in the classroom, and now I look forward to the next time I can teach.


Here I am demonstrating the proper use of the conductivity meter.

Sunday, March 14, 2010

Lab 7 – Lichens and the Environment

The lichens and environment lab turns out to be one of the more complex and elaborate labs. The lab procedure had to be divided up into portions, since certain parts of the lab required materials to sit for thirty minutes. The teaching assistant first had the students begin the hands-on portion, and then once again he offered one of his bonus point opportunities. He had asked the students to read over this lab in the manual prior to class, and if they had, then the question asked would have been easy to answer. Again, the lesson of being prepared was pressed on the students, which seems to be becoming an important idea in this class.

With the bonus opportunity done, the lecture on the material was covered, and then next portion of lab was started. This section required a higher precaution for safety due to the use of heavy metal solutions. The teaching assistant and I ensured everyone wore gloves and goggles, and proper use of the heavy metal solutions was enacted. Between managing a divided lab procedure and enforcing safety, it was an impressive amount of experience for managing future classes.

At the end of this portion of the lab, students had to let their lichen sit for another thirty minutes. During this time, I led the students outside to survey lichen on trees, while the teaching assistant secured the classroom and made sure no one was staying behind. Outside we circled between groups, answering questions with the use of real examples in front of us. Seeing lichen in the class is one thing, but seeing it outside in the real world is definitely a better way to drive home the information and make sure it is remembered. The class was then taken back inside to analyze to lichen and answer any remaining questions.

All in all, this week’s lab was a time management experience lab. With the small amount of time available, it was important to divide up the lab to ensure the subject matter was covered and students left with a complete understanding. The only thing that could have improved this was to go over what pollutants could give off the heavy metals used in lab that would kill the lichen. This would complete the circle of information on how lichens interact and react with their environment.


The tools, materials, and heavy metal solutions used to test lichen absorbancy.


The different examples of lichen offered for viewing in the class.

Monday, March 8, 2010

Lab 6 - Environmental Microscopy

This was an especially important lab for me, as it was my first week actually teaching and leading the lab class. I had chosen this lab in particular to teach due to having already taken upper lever classes that deal with microscopes. With an already extensive knowledge of how microscopes worked, I planned to teach a subject I was well versed in.

After the teaching assistant went over the results of last week’s allelopathy lab, he stepped down and allowed me to take control of the lab. I began my lecture, talking about the different types of microscopes, how they work, and some examples of microscopes specimens. Since I am taking a parasitology class right now, I showed a couple pictures of one of the parasites I have studied in class. I briefly explained what it was and what it could do while trying to increase the students’ interest in microscopes. One of the worst parts of the lecture that I ran into was micromanaging. Not only did I have to speak about the subject, but walk to and explain the lab stations, point out the microscopes, bring my lab manual around with me as I walked, and change the PowerPoint slides. My first lecture was a bit messy as I attempted to do all of those at once, but I noted many of my mistakes and felt much improved when I had my second lecture.

The hands-on portion of the lab went smoothly in both of my classes. I found that speaking in front of the class is something I have to work on, but handling small groups of people was easy. During this portion, I walked around the classroom, asking and answering questions and assisting students. I supervised as they made wet mounts and found them in their microscopes and was careful in explaining the safety procedures when working with the slide stain. While there were a wide variety of specimens on microscope slides to observe, I think a couple of demonstration stations could be placed with exotic microorganisms, such as a parasite or bacteria. This would expand interest in microscopes and have the students leave thinking of the interesting organisms they saw in class. Despite a few hiccups in the lab, I felt very confident in the end that I had been successful in teaching environmental microscopy. While there is still some nervousness about getting up in front of a large group of people again, I am very much looking forward to the next lab I teach.


Here I am speaking in front of the class.


This is the compound microscope the class used to observe slides with.


These two microscopes are dissecting microscopes that the students used to observe slightly small organisms with.


Here is where the class made a wet mount with green algae.


This is the staining station, where students stained pollen and compared a stained specimen and a non-stained specimen.

Monday, March 1, 2010

Lab 5 - Allelopathy

The allelopathy lab is the lab of the semester that students will have to write a scientific lab report for. They must perform an experiment that determines the effects of a plant essential oil on the radish seeds Raphanus sativus. Since the lab report is a large portion of this course’s grade, it is important that the students utilize the full extent of the lab time. To help with this, a procedure summary was assigned prior to this lab for students to write about and understand the procedure of the lab. From this, they learned how to do the lab and also gained some familiarity with the subject before they even came into the lab. In the end, it worked quite well and students were able to complete the lab without much trouble. Most likely assigning procedure summaries in the future would be good for any other labs with a complex subject.

After the students turned in their summaries at the beginning of lab, the teaching assistant began his lecture on allelopathy. To help understanding of the subject, he used examples of allelopathic plants that students would know around Georgia. After the lecture, students proceeded directly into the lab portion, setting up petri dishes with radish seeds, water, and the essential oil treatment and reading information sheets of examples of allelochemicals. The teaching assistant helped students at the treatment station, while I helped students as I walked between the rest of the stations.

The lab went quite smoothly even though the subject was more complex than most other labs. The procedure summaries help jumpstart the lab, and students were able to create accurate hypotheses and predictions for their lab report. The only improvement capable is perhaps having two different essential oil treatments and comparing their effects on the seeds. This would further student’s knowledge of why plants produce allelochemicals and what they can do.


This is the essential oil used in this week’s lab, Mentha piperita (peppermint).


The control for experiment was this DI water.


These are the microcapillary tubes the students used to measure out the essential oil and DI water.


This is where the students looked at allelopathic specimens and read over allelochemical information sheets.

Monday, February 22, 2010

Lab 4 - Scientific Writing

The fourth week of labs covered the aspects of scientific writing. This lab’s beginning lecture went over the parts of a scientific paper, from the title to the references. Then the teaching assistant explained how the first hands-on portion of the lab would go. Each bench of students had an envelope of shuffled parts of a scientific paper. The students had to organize the parts into the proper sequence, demonstrating their understanding of the order of a scientific paper. As they completed, I went from bench to bench, checking their results and helping them reach the right conclusions.

The next portion of the lab dealt with writing and reproducibility. Model kits with small parts were handed out, and the students were instructed to build a simple model and write down the steps. They then had to switch steps with another group to see if they could follow the steps. This greatly impressed upon the students the need for clear and precise steps in writing a scientific paper so that others can follow your steps exactly.

After finishing the model kits, students were then allowed to use laptops to find the online scientific paper designated by the teaching assistant. They had to search the GALILEO online database and then answer questions pertaining to the paper itself. These questions helped point out important characteristics and themes of scientific papers.

Each portion of this week’s lab did a great job of teaching and reinforcing this week’s subject. An actual scientific paper will be assigned with the next week’s lab, so it was important for students to leave lab with a complete understanding. The only addition that could be made is one section of the workbook having abstract and introduction pairs. Many students had difficulty distinguishing between the two, and in this portion they would label which is which and explain why.


The model kit used for creating steps similar to those in an experiment.

Monday, February 15, 2010

Lab 3 - Scientific Investigation


The third week of labs had the first quiz, which was over the syllabus and the two previous labs. This is also the week that the material begins to require a more critical thinking. To start the students off on the right path, this lab covered the principles of the scientific method.

At the beginning of the lab, the teaching assistant handed out the quizzes for the students to take. Fifteen minutes were given to complete it, and during that time the teaching assistant and I walked around the students looking for possible cheaters and answering questions. Once fifteen minutes passed, the quizzes were taken up, and the teaching assistant went over the answers. When he discussed the answers to the section on scientific conversions, he revealed that he had pulled the context of a few of the questions from the review sheet. This was the same review sheet he had told students is not mandatory but highly recommended. This was another of those moments that he had created to instill the need to be prepared and go above and beyond. It will be interesting to see how many students see this incentive and take advantage of future non-mandatory work to help their studies.

The rest of the class involved a lecture and workbook pages over the scientific method, graphs, and tables, while the teaching assistant and I walked around answering questions. Once the students had completed their pages, they were allowed to do an experiment to which they would apply the scientific method. This experiment had students comparing and recording the watts used by incandescent and compact fluorescent lamp (CFL) bulbs. They then had to average the data and convert it into the dollars per year spent on supplying the electricity. The CFL bulbs proved to be much more efficient, demonstrating to the students the value of going green.

This experiment resulted in an excellent follow up to last week’s Building Green lab. They knew of greening techniques before, but now the students can see what value they have. A consecutive lab on the same subject also helped establish further connections and applications with the scientific method, and no doubt the appeal of saving money will also motivate students to go green.


Items used in the scientific method experiment - lamp, CFL bulb (in lamp), incandescent bulb, power meter

Monday, February 8, 2010

Lab 2 - Building Green

The second week of labs has passed by successfully with a focus on green building practices, which consisted of how sustainability combined with environmentally and people-friendly methods produces reliable green buildings. The main example of this lab was the U.S. Green Building Council’s Leadership in Energy and Environmental Design (LEED) rating system. This system helps classify green buildings in terms of their sustainability. Georgia Southern University’s Recreation Activity Center is certified in this system, which provided a visual of how green buildings look for the students.

Right at the start of the lecture, the teaching assistant asked the class to pull out their semester schedules for the lab. He had told the class that the schedule was available online for printing, but it was not a requirement to print it out. However, he checked off which students had their schedules and gave them a bonus point as a reward for being ready and keeping up with the class. To me, it seems like a very clever way to motivate the class. By having these unannounced bonus opportunities, an incentive is established for the students to work harder and be prepared for each class.

The teaching assistant then proceeded with the rest of the lecture, describing what makes buildings “green,” sustainability, and LEED. I noticed that in the middle of discussing what makes buildings “green,” he stated the normal practices of utilizing natural light, solar panels, and shading but also low emission paint. This low emission paint was quite interesting to me because it was something that I had never even considered could be made green. It came as a surprise, and even the teaching assistant presented it in that way. While it may not have exactly peaked the interest of many of the students, it was still a piece of information that sounded out of the ordinary and probed the mind into searching for what else could be made green.

After the lecture, the students were released to inspect and assess the campus buildings for their green design. Upon their return, they finished up their worksheets by completing their inspection forms and drawing maps designating the green properties of the buildings. The teaching assistant and I assisted the groups with any questions they had regarding the material. Most of the time the students worked diligently with their pencils constantly moving. However, when a pencil did stop for a good amount of time, the student was usually stuck on a problem. In the future this is something I plan to keep an eye out for as I walk around the room, so I can head over and be on the spot for any questions.

Building green was an efficient and effective lab. For the future, I would suggest the students draw two maps. One having the original green properties the buildings have now, and the other having designations of where new green additions could be made. This could include skylights, solar panels, bike racks, windows, and other additions the student thinks would be green. This would teach the students to not only observe the green characteristics of buildings, but how to implement them in a spatial arrangement for maximum sustainability.

The students can also visit http://www.epa.gov/greenhomes/index.htm to gather additional information about the components and goals of building green.

Monday, February 1, 2010

Lab 1 - Scientific Measurement

This past week was the first week of actual labs, in which the students took scientific measurements using the international system of units. Measurements on mass, volume, length, and temperature were all included in the labs to give the students an understanding of proper measuring techniques and conversions.

My focus during the initial lecture of the labs was observing the teaching assistant in charge of the lab. He was mostly on the move around the room, explaining the metric system as well as asking questions to stimulate minds and helping students reach answers. His movement around the room also seemed to keep the lecture from getting dull, giving the students something to focus on as they listened.

After the lecture, the class headed outside to the small lake on campus where they took measurements. During this time the teaching assistant and I walked from group to group, assisting students and answering questions. When I was asked questions, I tried to do the same as the teaching assistant. When I could I attempted to help the student answer their own question by pointing out certain facts. It takes a little longer than giving a direct answer, but it provides more experience and critical thinking for the student.

We returned to the classroom once the groups finished. Inside, the students took more measurements using graduated pipets and electronic balances. Stations were set up around the room, one with the electronic balance to measure seed, and the other had filled graduated cylinders that were measured by their menisci. Once again, the teaching assistant and I walked around the room, answering questions in the same manner. Afterward, the students worked on problem solving questions based on measurements to finish the lab.

This week’s lab material was solid in both providing information and presentation, but I think an addition could be made. The introduction to the lab touches briefly on U.S. customary units and their relationship to the international system of units. While the primary objective of this lab is to teach the international system, it could do with having a small section on measuring in U.S. customary units and converting them to the international system. This section would help develop unit conversion and real world skills if they would ever need to convert between the two systems in the future.


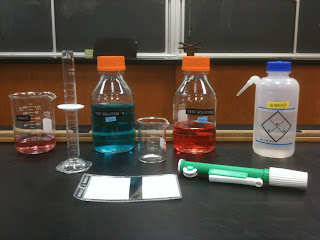
These are the items students used to measure volume, including graduated pipet, graduated cylinder, beakers, solutions, a meniscus reader, and DI water.


Tape measures, rulers, measuring wheels, and thermometers were all used during the outdoor activity.


This is the electronic balance, weigh boat, and seeds students used to measure mass.


These two graduated cylinders were measured by their meniscus to determine their volume.

Monday, January 25, 2010

Introduction and Purpose

This blog will act as my portfolio for my Teaching Internship in Biology course, which will last the spring semester of 2010 at Georgia Southern University. Here is where I will provide posts based on my environmental biology labs each week, which will include reflections, suggestions, descriptions, photographs and experiences. After each week of labs I will update on what was taught, what happened during lab and what I learned.